Manual
We continuously try to keep this manual as up to date as we can. If you are still missing something important, we would like to be informed.
We do have some practical example videos with explanations, though they are in Dutch:
Winding a bobbin
Placing the lower thread
Inserting the bobbin case into the machine
Placing the upperthread
The presser foot of the machine
Replacing a needle
Click here for the manual in PDF format.
Click here for our easy photo manual for how to place the thread in the machine, setting the machine 'on time' and checking the needle depth.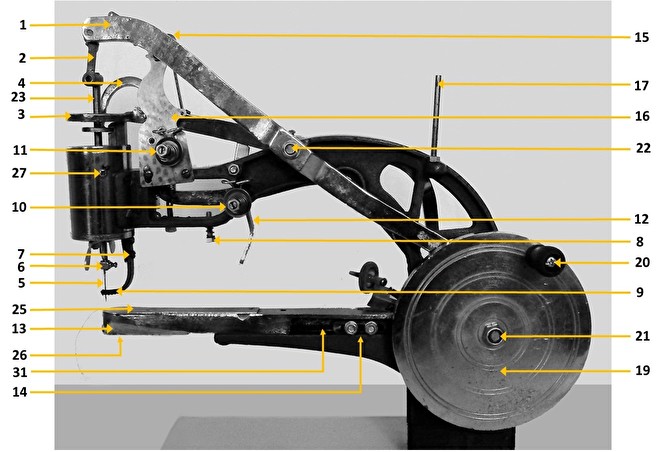
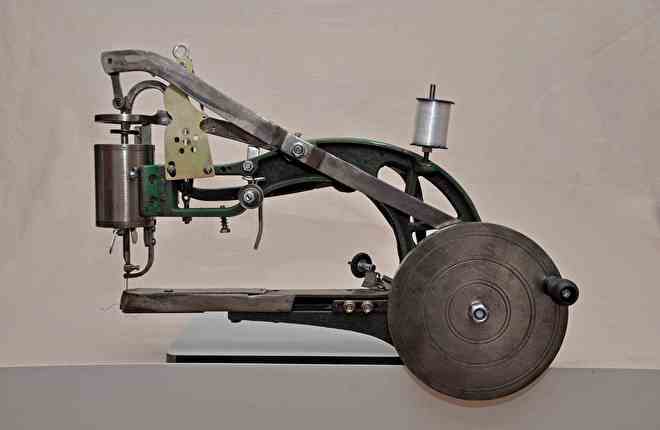
1. Main needle drive rod
2. Needle bar joint
3. Drive rod for foot pressure
4. Drive rod for stitch length
5. Needle
6. Needle clamp
7. Presser foot screw (determines the pressure)
8. Screw to determine the length of the stitch
9. Presser foot
10. First upper thread break
11. Second upper thread break
12. Presser foot lever
13. Lower arm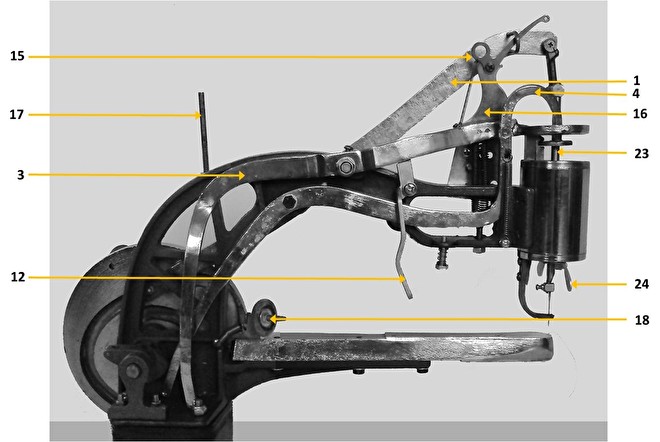
14. Drive rod connecting piece
15. Thread take up lever (feed)
16. 'Bird' (determines thread feed per stitch)
17. Spool pin
18. Bobbin winder
19. Flywheel
20. Flywheel handle
21. Flywheel mounting shaft
22. Main needle drive rod mounting shaft
23. Thread shaft
24. Wing nut to determine in which direction to sew
25. Bobbin cover/needle plate
26. Lower cover flap for the lower arm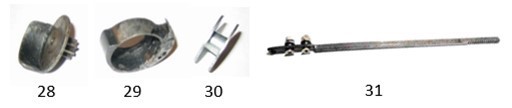
27. Thread guide
28. Bobbin case holder
29. Bobbin case
30. Bobbin
31. Drive rod for bobbin case holder
Preparing for the first use
When you receive the sewing machine, the flywheel and spool pin must be installed.
- Apply Vaseline in the tracks of the flywheel. Position the flywheel so that each arm runs in its own flywheel track. Make sure that the small notch on the shaft fits exactly into the recess of the flywheel. Tighten the self-locking nut: the flywheel, shaft and cams should have no play. You can stick a sticker with an arrow on the flywheel so that you know which direction to turn (clockwise).
- The moving parts must be lubricated regularly to keep the machine running smoothly and quietly. This increases the ease of use and extends the life of the machine.
- Move the foot upwards to avoid friction between the foot and the lower arm. Check that all screws are properly tightened. All moving parts must be lubricated. You can deduce whether the machine is functioning properly from the noise that the machine makes.
Removing the bobbin and bobbin case from the machine
- Move the needle into the highest position by using the flywheel.
- Move the foot up with the presser foot lever.
- Turn the bobbin cover/needle plate clockwise.
- Remove the bobbin and bobbin case with pliers or tweezers or use a magnet.
Winding a bobbin
- Turn the bobbin winder onto the flywheel.
- Take a bobbin and wind the desired thread around the bobbin several times. Hold the end. Then place the bobbin on the bobbin winder so that the thread will continue to be wound as soon as the flywheel is turned (always turn it clockwise). Place the spool in line with the bobbin winder and turn the flywheel to wind the bobbin. Make sure that the thread is wound evenly on the bobbin.
- Cut the thread when the bobbin is full enough. Take the bobbin from the bobbin winder and turn the bobbin winder away from the flywheel.
Inserting the upper thread
- Move the foot with the presser foot lever down.
- Place the spool on the spool pin.
- Feed the thread through the hole in the main needle drive rod (located at the mounting bolt).
- Then pass the thread through the first brake.
- The thread can optionally also be guided through the second brake for more thread tension. This is usually not necessary.
- Pass the thread through the thread guide from bottom to top and pass it under the main drive rod to the thread take-up lever.
- Pull the thread through the thread shaft (possibly with a getting-thread-through-needle-shaft-hook).
- Pass the thread through the eye of the needle and through the opening in the foot.
- Feel if the thread tension is sufficient.
- Replace the foot with the presser foot lever up.
Inserting the bobbin/lower thread
- Take the end of the thread and pull it from the inside out through
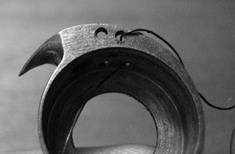 the rightmost hole. Then pass the thread under the tab and pass the thread through the other hole (the right hole at the top of the bobbin case (as shown in the photo). Place the bobbin in the bobbin case. Check if the thread is not caught and the tension is sufficient.
 - The tension can be adjusted by loosening or tightening the screw of the tab. For maximum thread tension (especially applicable for thin and smooth thread), use the two left holes of the bobbin case.
- Place the bobbin case with bobbin in the lower arm on the bobbin case holder.
- Run the wire over the notch of the lower arm.
- Close the bobbin cover.
- Hold the upper thread and turn the flywheel one whole round until the needle is back in the upper position. Then pull the upper thread so that it pulls the bobbin thread up with it. Now pull the bobbin thread further out of the lower arm (possibly you might need an awl) and guide it backwards.
Sewing the first stitches on a test piece
- Place the material to be sewn on the lower arm. Hold the lower and upper threads towards the back (towards the flywheel).
- Move the foot with the presser foot lever down.
- Turn the flywheel to experience stitch length and thread tension.
info@leernaaimachine.nl
+ 31 (0)6 24 45 65 85


